
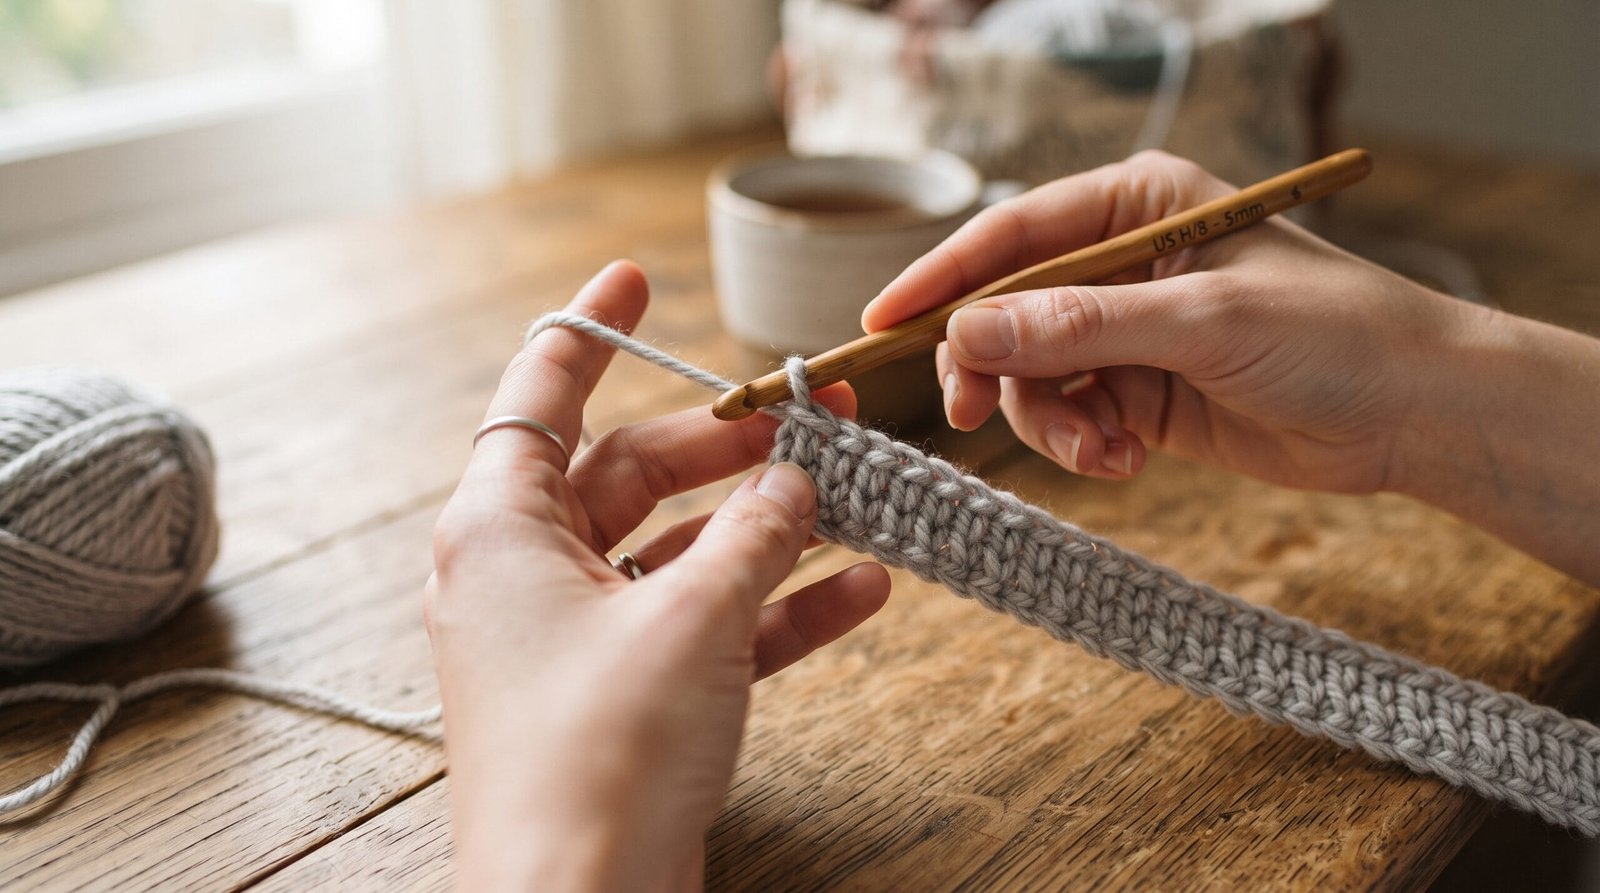
I spent years starting every project the same way — chain a long row, turn, then work double crochet back into stitches I could barely see. Foundation double crochet changed that for me, and if you’ve ever miscounted a foundation chain or fought with a curling first row, it might change it for you too. In this guide I’ll walk through exactly how the stitch works, how to read an fdc chart if your pattern uses one, and where it actually earns its place in real projects.
I picked up FDC about six years ago while working on a cardigan that needed a stretchy, non-curling bottom edge, and it’s been part of my regular toolkit ever since — not for everything, but for a specific set of projects where it solves a real problem.
What Foundation Double Crochet Actually Is
This stitch, usually shortened to fdc, combines your starting chain and your first row of double crochet stitches into a single step. Instead of chaining a long foundation row and then working double crochet back into each chain, you build the “chain” and the double crochet on top of it at the same time, stitch by stitch.
The result looks nearly identical to a regular chain-plus-dc row once it’s finished, but the process is different, and so is the outcome — the edge has noticeably more stretch, and there’s no separate chain row to miscount or lose track of.
If you’ve worked foundation single crochet before, this is the same idea, just one stitch height taller. And if you haven’t, don’t worry — the logic carries over cleanly once you’ve got the double crochet version down.
Why Bother Learning It
I want to be honest here: fdc isn’t strictly necessary. Every single thing you can make with fdc, you can also make with a regular chain and a first dc row. So the real question is whether the trade-offs are worth it for a given project, and for me, they usually come down to three things.
It doesn’t curl. A tightly chained foundation row has a tendency to roll or cup, especially in acrylic or cotton, which then fights you when you try to block it flat. FDC’s built-in stretch avoids a lot of that.
You can’t lose count of a separate chain. This is the one that sold me. I’ve frogged more projects than I’d like to admit because I chained, say, 121 for a blanket, turned, worked a full row of double crochet, and came up two stitches short somewhere in the middle of that long chain. With fdc, the chain and the stitch are built together, so miscounting the row means miscounting the actual stitches you’re making — much easier to catch as you go.
It’s genuinely faster on long rows. You’re doing one pass instead of two (chain, then work back into it). On a scarf-width row that’s not much of a difference. On a full-width blanket foundation row, it adds up.
The trade-off is that fdc has a slightly steeper learning curve than a plain chain, and your first ten or so stitches will probably look uneven while your hands figure out the rhythm. That’s normal — mine did too.
How to Foundation Double Crochet: Step by Step
Here’s the method I use and teach, written the way I’d actually explain it to someone sitting next to me.
Getting started:
- Make a slip knot and place it on your hook.
- Chain 2. This pair of chains does the same job as the “ch 3 turning chain” in a normal dc row — it gives you the height to work your first stitch.
Your first fdc stitch:
- Yarn over, then insert your hook into the second chain from your hook (not the slip knot itself, the chain just before it).
- Yarn over and pull up a loop. You should have 3 loops on your hook at this point.
- Yarn over and pull through just the first loop on your hook. You’ll still have 3 loops on your hook — but now the bottom one is a new chain stitch that’s going to act as the base for this fdc.
- Yarn over and pull through 2 loops (2 loops remain).
- Yarn over and pull through the last 2 loops.
That’s one complete fdc stitch. Notice what you actually built: a chain stitch and a double crochet stacked on top of each other, made in one continuous sequence rather than two separate rows.
Every stitch after that:
- Yarn over, then insert your hook under both loops of the chain you made in step 5 of the previous stitch — it’s sitting right at the base of the stitch you just finished, and once you know what you’re looking for, it’s easy to spot as a little “V.”
- Yarn over and pull up a loop (3 loops on hook).
- Yarn over and pull through the first loop only (still 3 loops on hook, new base chain created).
- Yarn over and pull through 2 loops.
- Yarn over and pull through the last 2 loops.
Repeat steps 8 through 12 for every additional stitch until you’ve made as many fdc as your pattern calls for.
The part that trips people up almost every time is step 8 — inserting into the right chain. It’s easy to accidentally work into the wrong loop, or into the stitch itself instead of its base chain, especially in the first few attempts. Go slowly here and actually look at what you’re inserting into rather than going by feel; once your eye learns to spot that little V shape, it gets much faster.
Reading a Foundation Double Crochet Chart
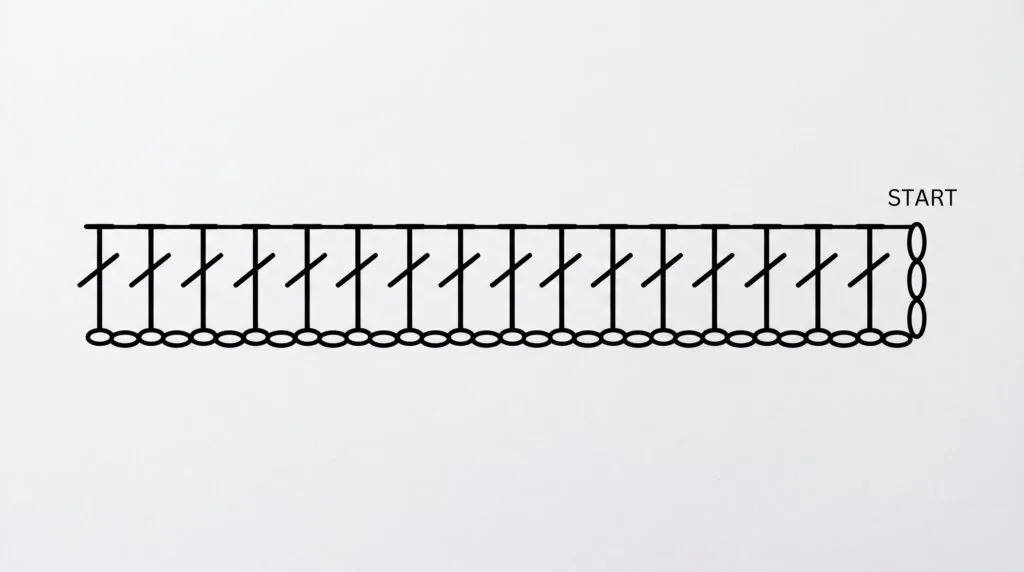
Written instructions work fine, but a lot of patterns — especially ones with any kind of shaping or stitch pattern layered on top of a foundation row — will show you an fdc chart instead of, or alongside, the written steps.
Crochet charts use a small set of standardized symbols so that a stitch pattern is visually readable at a glance rather than buried in a paragraph of abbreviations. According to the Craft Yarn Council’s standardized crochet chart symbols, these symbols are meant to represent each stitch roughly the way it looks from the right side of the finished fabric, so a double crochet symbol (typically a taller vertical mark with a horizontal bar through it) visually mirrors the actual shape of a dc stitch once it’s worked.
On an fdc chart specifically, you’ll usually see that same double crochet symbol, but with a small chain or oval mark at its base rather than sitting on a separate chain row below it — that little base mark is the visual shorthand for the built-in foundation chain of each stitch. It’s a small detail, but once you know to look for it, you can tell an fdc chart apart from a regular dc chart at a glance, without reading a single word of the pattern key.
If a chart symbol ever looks unfamiliar or slightly different from what you expect, check the pattern’s own key first — most designers stick close to the industry-standard symbols, but not everyone does, and a mismatched interpretation of one symbol can throw off an entire row.
Fixing the Most Common FDC Problems
The row is curving like a banana. This is almost always a tension mismatch between the chain portion of each stitch and the double crochet on top of it — usually the chain part is coming out tighter than the dc part. When you pull up the loop in step 9, make a conscious effort to pull it slightly higher and looser than feels natural at first. It’ll look a little sloppy mid-row, and it straightens out once you work your next row into it.
Stitches are getting progressively smaller as I go. This one happened to me constantly when I first learned fdc, and it came down to unconsciously tightening my tension the more stitches I made — a kind of fatigue-driven creep. Periodically stop and compare your fifth stitch to your fiftieth. If there’s a visible size difference, ease off deliberately rather than trying to fix it after the fact.
I can’t find the base chain to insert into for the next stitch. Turn your work slightly so you’re looking at the stitch from an angle rather than straight on — the base chain sits just underneath and slightly behind the top of the stitch you just made, and it’s much easier to spot in profile than head-on. Stretching the fabric gently between your fingers also helps make that little V pop out.
My stitch count is off at the end of the row. Because there’s no separate chain to double-check against, an early miscounted stitch in fdc tends to compound. If your count is off, don’t guess — count back from the end in groups of ten to isolate roughly where the mistake happened, rather than unpicking the entire row.
Foundation Double Crochet Patterns: Where This Stitch Actually Belongs
Not every project benefits from fdc, and figuring out when to reach for it took me longer than I expected. Here’s how I actually decide.
Garments with a hem or cuff edge. This is where fdc earns its keep the most, in my experience. Sweater hems, cardigan bottoms, cuffs — anywhere you want stretch and a clean, non-curling edge — benefit from the extra give built into the stitch. A rigid chained foundation on a garment hem tends to fight the rest of the fabric’s drape.
Long, wide foundation rows. Blankets, wraps, anything with a foundation row of 150+ stitches. The time savings from skipping the separate chain-and-work-back approach becomes genuinely noticeable at that scale, and there’s less risk of the whole project unraveling from a miscounted chain buried somewhere in the middle.
Anywhere you’d normally fight a too-tight starting chain. If you’re someone whose foundation chains always come out tighter than the rest of your fabric (a very common tension habit, especially for newer crocheters), fdc sidesteps the problem instead of asking you to consciously loosen your chain tension, which is a hard habit to build.
Where I don’t reach for it: small, fussy pieces like amigurumi components or anything worked in the round from a magic ring, where there’s no long foundation row to begin with, and anything where a firm, structured edge is actually what you want rather than stretch — a stiff market bag base, for instance, benefits from a tighter, less flexible foundation than fdc naturally gives you.
If you’re newer to foundation stitches generally and want the single crochet version first (a good warm-up before attempting fdc, honestly), I’ve got a full breakdown over on my foundation single crochet guide that covers the same logic at a slightly gentler stitch height.
FDC Versus a Regular Foundation Chain, in Practice
It helps to actually see both methods side by side on the same swatch, which is something I made every student in a workshop I taught do a few years back. Half the room chained 30 and worked a row of double crochet back into it. The other half worked 30 fdc stitches directly. Same yarn, same hook, same person’s hands on each side.
The chained version measured slightly narrower and noticeably stiffer along that bottom edge — you could see it cupping upward at the corners even before blocking. The fdc version sat flatter right off the hook and had visibly more give when you tugged it width-wise between two fingers. Neither swatch was “wrong,” but if you laid them next to each other, most people in that room picked the fdc edge as the one they’d rather have on a garment hem.
The chained method still has its place, to be clear. It’s more forgiving for an absolute beginner because you’re only ever doing one thing at a time — chain, then work a stitch — rather than juggling both in the same motion. If someone’s crocheted for less than a few months, I’ll usually tell them to get comfortable with a standard chain-and-dc row first and circle back to fdc once double crochet itself feels automatic.
A Note on Yarn and Hook Choice for Practicing
Any yarn weight technically works for fdc, but I’d steer a first attempt away from the extremes. Very fine fingering-weight yarn makes the base chain of each stitch fiddly to see, and bulky yarn can make it hard to tell where one stitch’s base chain ends and the next one’s begins, since everything’s thicker and closer together.
A mid-range worsted weight yarn in a light or medium color, paired with a hook in roughly the 4mm to 6mm range, tends to be the easiest combination for actually seeing what you’re doing while you learn — dark yarns and heavily textured or fuzzy yarns (mohair, chenille, anything brushed) hide stitch definition, which is the last thing you want while you’re still learning to spot that little base-chain V. Once the motion is comfortable, switching to whatever weight your actual project calls for is no problem.
Adjusting a Pattern That Wasn’t Written for FDC
Most patterns you’ll come across weren’t written with fdc in mind — they’ll just say something like “ch 61, dc in 4th ch from hook and in each ch across.” You can still use fdc here, but it takes a small bit of translation, and getting it wrong is the most common mistake I see people make the first time they try substituting it in.
The key thing to remember is that a traditional dc row skips the first 3 chains to account for the turning chain, which means a “ch 61” foundation only actually produces 58 double crochet stitches once you subtract those 3. Since fdc’s chain-2 doesn’t get skipped the same way, you’d work fdc 58 — not fdc 61 — to land on the same final stitch count.
I’d genuinely recommend writing that number down before you start, right on a sticky note next to your pattern, rather than trying to do the subtraction in your head mid-row. It’s a small arithmetic step, but it’s exactly the kind of thing that’s easy to get wrong when you’re also focused on the mechanics of a stitch you’re still getting used to.
Once you’ve got the adjusted stitch count, everything else in the pattern carries on as written — the fdc row simply stands in for “chain, turn, work row 1,” and every row after that treats your fdc stitches exactly like it would treat a normal first row of double crochet.
Practicing the Technique
If you’re learning this for the first time, don’t start on your actual project. I know that’s tempting — it always is — but fdc has a real learning curve for the first ten to fifteen stitches, and you don’t want that learning curve happening on the edge of a sweater you care about.
Grab a scrap ball of any worsted weight yarn you have on hand and a hook in roughly the 4mm–6mm range (worsted weight yarn generally pairs well with a hook somewhere in that range, though the right size for your own tension may land a little higher or lower). Work a practice row of about twenty stitches, rip it out, and do it again. By the third attempt, most people’s hands start finding the rhythm on their own — mine did, anyway, somewhere around the second practice row.
How To Work A Foundation Double Crochet Stitch on video
Frequently Asked Questions
Is fdc the same as a regular double crochet, just started differently? Once it’s made, yes — the finished stitch looks essentially the same as a regular dc worked into a chain. The difference is entirely in the process: you’re building the chain and the stitch together rather than chaining first and coming back to it.
My pattern says “fdc 40” — does that include the starting chain-2, or is that separate? The starting chain-2 is not counted as a stitch; it’s just there to give you the height to begin, similar to how a turning chain works in a regular row. “Fdc 40” means you should end up with 40 actual fdc stitches after that initial chain-2.
Can I substitute fdc into any pattern that starts with a chain and a dc row, even if the pattern doesn’t mention fdc? In most cases, yes — if a pattern starts with something like “ch 41, dc in 4th ch from hook and in each ch across,” you can generally replace that with fdc 39 (accounting for the turning chain difference) and get a very similar result with more stretch. It’s worth swatching first if the project has any sizing that matters, since fdc rows can measure very slightly differently than a chained-and-worked row of the same stitch count.
Why does my fdc look fine for the first few stitches and then start looking messy? This is almost always a tension or visibility issue that compounds as you go — either your tension is drifting stitch to stitch, or you’re starting to lose track of exactly where the base chain sits and inserting slightly off each time. Slow back down to the deliberate, look-before-you-insert pace you used on your very first stitch; the messiness usually isn’t a sign you’re doing it wrong structurally, just that you sped up before your hands were ready to.
Wrapping Up
Foundation double crochet isn’t a stitch you need for every project, but once you’ve got it under your hands, it solves a specific, recurring problem — that tight, curling starting edge — better than any amount of consciously loosening your chain tension ever will. If you’re working on anything with a long foundation row or a hem that needs to stretch, it’s worth the slightly awkward first practice attempts.
Give it a try on a scrap swatch before committing it to a real project, and if you get stuck on any step, drop a comment below — I answer every one, and there’s a decent chance someone else hit the exact same snag. If this helped, sharing it or following along for more stitch-technique breakdowns keeps this kind of content coming.



Great post,Thanks for sharing