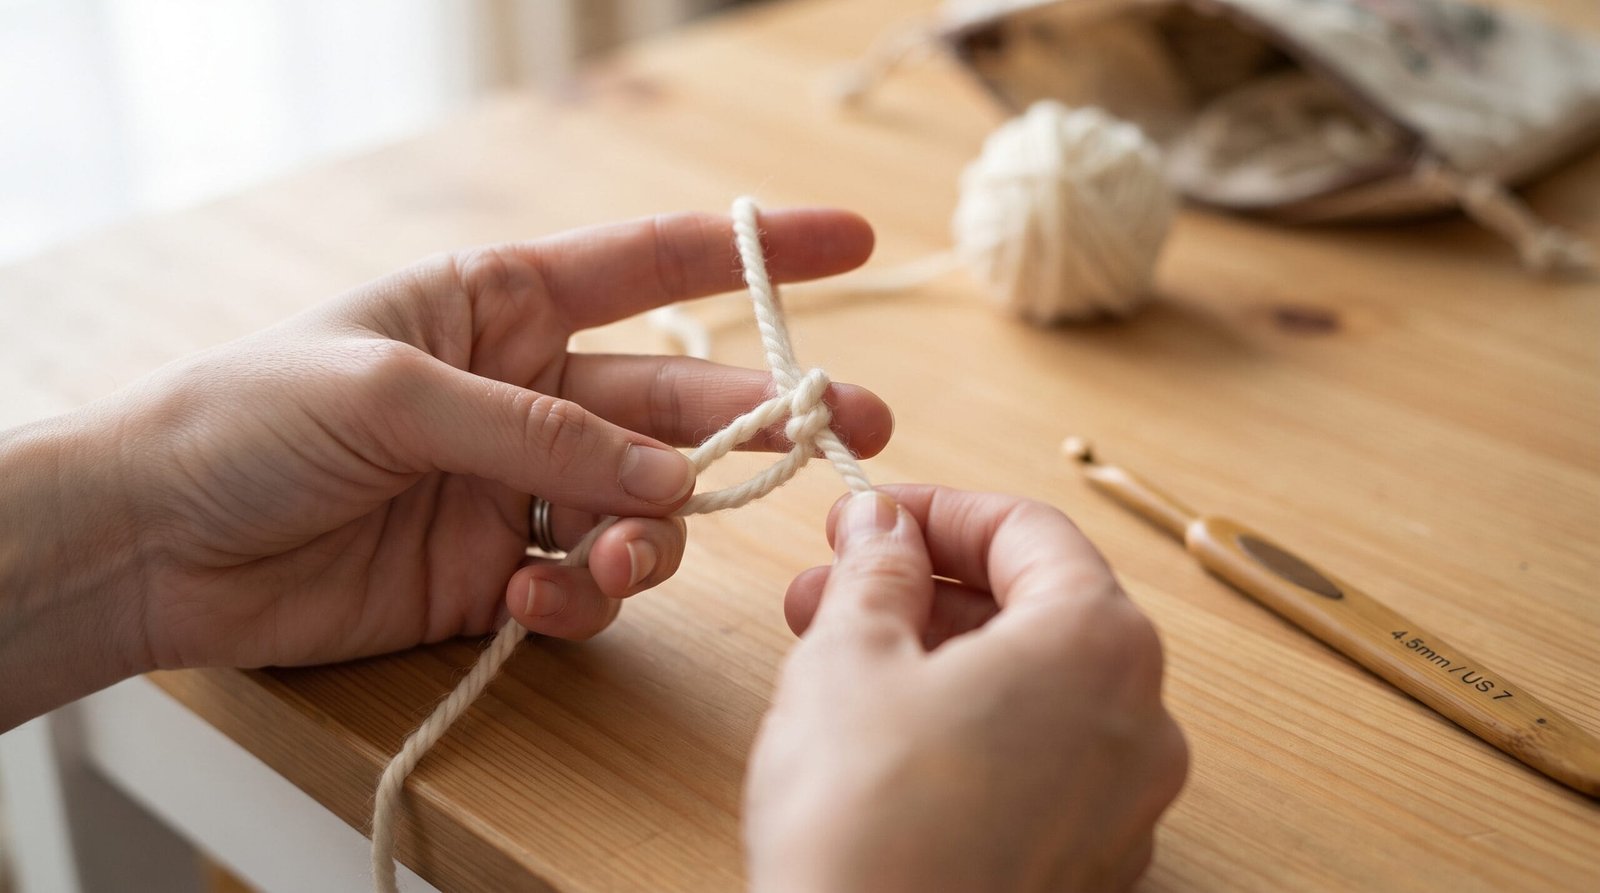
Learning how to make a slip knot crochet-style is the actual first physical step of almost every crochet project that exists, before a single stitch has even been worked. It looks like a small, unremarkable knot, but it’s built specifically to slide and adjust rather than lock tight, which is exactly what makes it usable as the anchor point for your very first stitch.
This guide covers two different ways to tie it, how to hold your hook and yarn once it’s on your hook, and the natural next step — turning that slip knot into your first actual chain stitch — since a slip knot on its own doesn’t do much until it becomes part of something.
What a Slip Knot Actually Is, and Why Crochet Starts Here
A slip knot is different from the kind of knot most people already know how to tie, like a shoelace knot or an overhand knot, in one important way: it’s designed to slide open and closed along the strand rather than locking permanently in place. That adjustability is the entire point — once it’s on your hook, you can tighten or loosen it slightly to get a comfortable working tension before you start your first chain, rather than being stuck with whatever tightness the knot happened to land at.
This is also why a slip knot isn’t unique to crochet — the same basic knot anchors the first stitch in knitting too, and shows up in other fiber crafts for the same reason: it gives you an adjustable, non-permanent starting loop to build from.
What You’ll Need
Genuinely minimal for this specific step — you don’t need your full project materials yet, just enough to practice the motion.
A length of yarn, ideally a smooth, medium-weight yarn (worsted or DK) for practicing, since a fuzzy or very textured yarn can make it harder to see exactly what your fingers are doing the first few times.
A crochet hook, sized appropriately for whatever yarn you’re practicing with, though for the knot itself the exact size barely matters — you’re not making stitches yet, just getting comfortable with the motion.
How to Make a Slip Knot Crochet-Style: The Standard Method
This is the most commonly taught version, and it’s worth learning first since it’s what you’ll see demonstrated in most patterns and video tutorials.
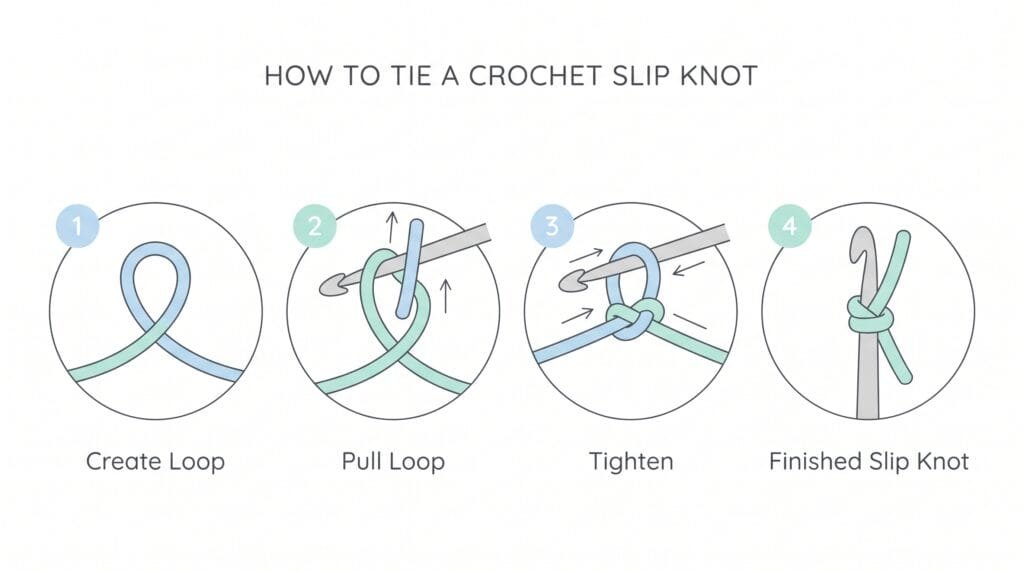
Step one: Leaving a tail of at least six inches (longer is fine, shorter makes the next few steps fiddly), make a loop with your yarn by crossing the working strand (the end connected to your ball or skein) over the tail end.
Step two: Look at the small loop you’ve just created. The strand that leads to your yarn ball should be sitting behind the tail strand at the crossing point.
Step three: Reach through that loop with your fingers or the tip of your hook, and pull a section of the working strand (the ball-side yarn, not the tail) through the loop, forming a second, smaller loop.
Step four: Pull gently on both the tail and the working strand at the same time. You’ll feel the knot cinch into a compact, defined shape rather than the loose, floppy loop it was a moment ago.
Step five: Slide this finished loop onto your crochet hook, then gently pull the working strand (not the tail) to snug the knot down against the hook until it moves freely but doesn’t flop loosely.
How Do You Make a Slip Knot Easy? A Simpler Finger Method
If the standard method above feels fiddly the first several tries — which is genuinely common — there’s an alternative approach many beginners find more intuitive, sometimes called the pretzel or finger-loop method.
Step one: Drape the yarn over two fingers of your non-dominant hand (typically your index and middle finger), with a tail hanging down on one side and the working strand hanging down on the other.
Step two: Cross the two hanging strands underneath your fingers, forming an X shape, with the working strand crossing over the tail.
Step three: Using your other hand, reach through the loop sitting on your fingers and pull a section of the working strand through it, forming a new loop, then slide your original two fingers out of the way as this new loop takes over as the working loop.
Step four: Pull both ends gently to cinch the knot, exactly as in the standard method’s step four, then slide the finished loop onto your hook.
Neither method produces a “better” or “more correct” slip knot — they end up as the exact same knot, just built with a different physical motion. Whichever one feels more natural in your hands is genuinely the right one to stick with.
Getting the Tension Right
A slip knot that’s too tight won’t slide at all, which makes it impossible to adjust once it’s on your hook — you’ll find yourself fighting the knot itself before you’ve even started your first real stitch. A slip knot that’s too loose, on the other hand, can slip open entirely if you tug the wrong strand, undoing the knot completely and sending you back to step one.
The goal is a knot that holds its shape but still slides smoothly along the strand when you gently pull the working yarn — snug, not locked. If you’re not sure whether you’ve got it right, gently tug the working strand (the ball-side yarn) after sliding the loop onto your hook; a correctly tied slip knot will tighten slightly and smoothly rather than either staying completely unchanged or suddenly cinching shut around the hook itself.
Common Mistakes When Making a Slip Knot
Pulling the wrong strand when tightening. This is probably the single most common early mistake — pulling the tail end instead of the working strand (or vice versa) at the tightening step can either undo the knot entirely or cinch it permanently tight around nothing, rather than leaving it adjustable on your hook. If your knot behaves unexpectedly, it’s worth checking which strand you actually pulled before assuming you did the whole process wrong.
Leaving too short a tail. A tail shorter than a few inches doesn’t leave enough length to comfortably grip and manipulate during the knot-tying steps, which makes an already-new motion feel more awkward than it needs to be. Starting with a generous tail costs you nothing — any excess gets trimmed or woven in later regardless.
Treating the slip knot as a permanent fixture. Some beginners tie the knot extremely tight, assuming tighter is more secure, the same instinct you might apply to tying a shoe. A crochet slip knot is meant to stay adjustable specifically so your very first stitch’s tension isn’t locked in by the knot itself — an overly tight slip knot fights against that flexibility rather than supporting it.
Losing track of which loop is which after the crossing step. Both methods above involve creating a loop, then pulling a new loop through it, and it’s easy to grab the wrong strand if you’re not pausing to actually look at which strand leads to your ball of yarn versus which one is the loose tail. Slowing down at this exact step, rather than rushing through muscle memory you don’t have yet, prevents most of the confusion.
How to Make a Slip Knot Crochet for Beginners: Holding Your Hook and Yarn
Once the slip knot itself feels comfortable, the next genuinely important beginner skill is how you actually hold the hook and manage your yarn tension, since this affects every single stitch you’ll ever make, not just the first one.
Hook grip generally falls into one of two common styles: a pencil grip, holding the hook the way you’d hold a pencil, with your hand resting more toward the top of the hook shaft; or a knife grip, holding the hook more like a knife handle, gripped from above with your whole hand wrapped around it. Neither is more correct than the other — plenty of experienced crocheters use each, and it’s worth trying both for a few minutes rather than assuming you need to copy whichever one a specific video tutorial happens to demonstrate.
Yarn tensioning through your non-hook hand controls how evenly your stitches come out, and it matters more than most beginners expect. A common starting method: weave the working yarn between your fingers (over one, under the next, over the next) rather than just letting it hang loose, which gives you consistent light tension to draw from as you work, rather than yarn that moves unpredictably with every stitch.
Practicing tension control specifically, separate from learning new stitches, is worth doing deliberately — working a long practice chain (covered in the next section) while paying attention purely to keeping your stitches a consistent size, rather than trying to also learn a new stitch at the same time, builds this feel faster than trying to absorb everything at once.
From Slip Knot to Your First Chain Stitch
A slip knot on its own doesn’t do anything — it becomes useful the moment you turn it into your very first chain stitch, which is the actual foundation most crochet projects are built on top of.
According to the Craft Yarn Council’s official beginner instructions, the standard sequence is to hold your hook with the slip knot already on it, bring the working yarn over the hook from back to front, catch it with the hook’s tip, and draw that caught yarn back through the slip knot’s loop — this single motion, repeated, is what builds your starting chain, one stitch at a time.
Each repetition of that yarn-over-and-pull-through motion adds one chain stitch, and the loop remaining on your hook after each pull-through becomes the new starting point for the next one. Most beginner practice pieces start with a chain of around twenty to thirty stitches, long enough to comfortably practice a first row of single crochet afterward without running out of foundation to work into.
Slip Knots and Magic Rings: Not Every Project Starts the Same Way
It’s worth knowing that a slip-knot-and-chain start isn’t universal across every single crochet technique, even though it’s the standard beginning for flat projects like scarves, blankets, and garments.
Amigurumi projects, covered in more depth in our crochet cow pattern guide, typically start with a magic ring instead of a chain — a different adjustable starting loop technique, built for a different purpose (closing a small circular opening at the center of a round piece, rather than building a long flat foundation). Both a slip knot and a magic ring share that same core idea of an adjustable starting loop, but they’re used for genuinely different project shapes, and it’s worth knowing the slip-knot method covered in this guide isn’t the only starting technique you’ll eventually need.
Troubleshooting Common Slip Knot and First-Chain Problems
The first chain stitch is too tight to work into later. This usually traces back to the slip knot itself being tied too tightly, discussed above, rather than a problem with the chain stitches that follow it. If your very first stitch always feels uncomfortably snug to work into on a later row, loosening your slip knot’s initial tension is worth trying before assuming your overall tension throughout the project is the issue.
Losing count of how many chains you’ve made. This is extremely common for genuine beginners and isn’t a sign you’re doing anything wrong technically — it’s purely a counting challenge. Pausing every five or ten chains to physically count what you’ve made so far, rather than trying to count silently in your head while also focusing on the motion, catches a miscount early rather than after finishing a long chain.
The knot slips completely undone while chaining. This means the slip knot was tied too loosely to begin with, or the wrong strand got pulled during an earlier tightening step. If this happens, there’s no harm done — simply untie whatever remains and start the slip knot over from scratch; it costs a few seconds, not a ruined project.
Crochet Slip Knot & Foundation Chain – How to Crochet for Beginners
Common Questions About Making a Slip Knot for Crochet
Does the slip knot count as my first crochet stitch? No — the slip knot is the anchor point your stitches build from, but it isn’t counted as a stitch itself. Your first actual stitch is the first chain you work after the slip knot is already sitting on your hook.
Can I use the same slip knot method for both crochet and knitting? Yes — the underlying knot is identical in both crafts, since both need the same adjustable starting loop. What differs afterward is what you do with it, not how the knot itself is tied.
Why does my slip knot look different every time I make one? Slight variation in exactly how the loops cross is normal and doesn’t usually cause a real problem, as long as the finished knot slides smoothly and holds its shape when gently tugged. If a particular version consistently causes trouble (won’t tighten, or comes undone unexpectedly), that’s a more useful signal to adjust technique than small cosmetic differences in how the knot looks.
Is one of the two methods in this guide actually better than the other? Not mechanically — both produce the identical finished knot. The finger method tends to feel more intuitive to some beginners since it doesn’t require manipulating the yarn with a hook tip during the tricky part, but plenty of experienced crocheters use the standard hook method exclusively. Trying both and sticking with whichever felt more natural is a perfectly reasonable way to decide.
Bringing It Together
Learning how to make a slip knot crochet-ready is a genuinely small technique on its own, but it’s the anchor point everything else in a project builds from — get the tension right, and your first several rows tend to go more smoothly than if the very first stitch was fighting you from an overly tight or loose starting knot. Combined with a comfortable hook grip and consistent yarn tensioning, it’s really the foundation the rest of crochet gets built on top of.
If you’re just getting started, we’d love to hear how your first few chains went — share a comment with any trouble spots, and follow along for more beginner guides like this one.