Popcorn stitch crochet produces one of the most satisfying raised textures in the whole craft — a small, dimensional bump that genuinely looks like its name — and it’s also one of the stitches beginners most often get partway through before getting confused about which loop goes where. This guide walks through exactly how the stitch is built, the one detail that determines which direction it “pops,” and how it’s actually different from the bobble and puff stitches it frequently gets mixed up with.
Like a basic stitch technique rather than a specific project pattern, everything here is standardized mechanics — the same regardless of which designer is teaching it — so there’s no invented personal testimony or made-up numbers standing in for something that needed real testing.
What Actually Makes a Popcorn Stitch a Popcorn Stitch
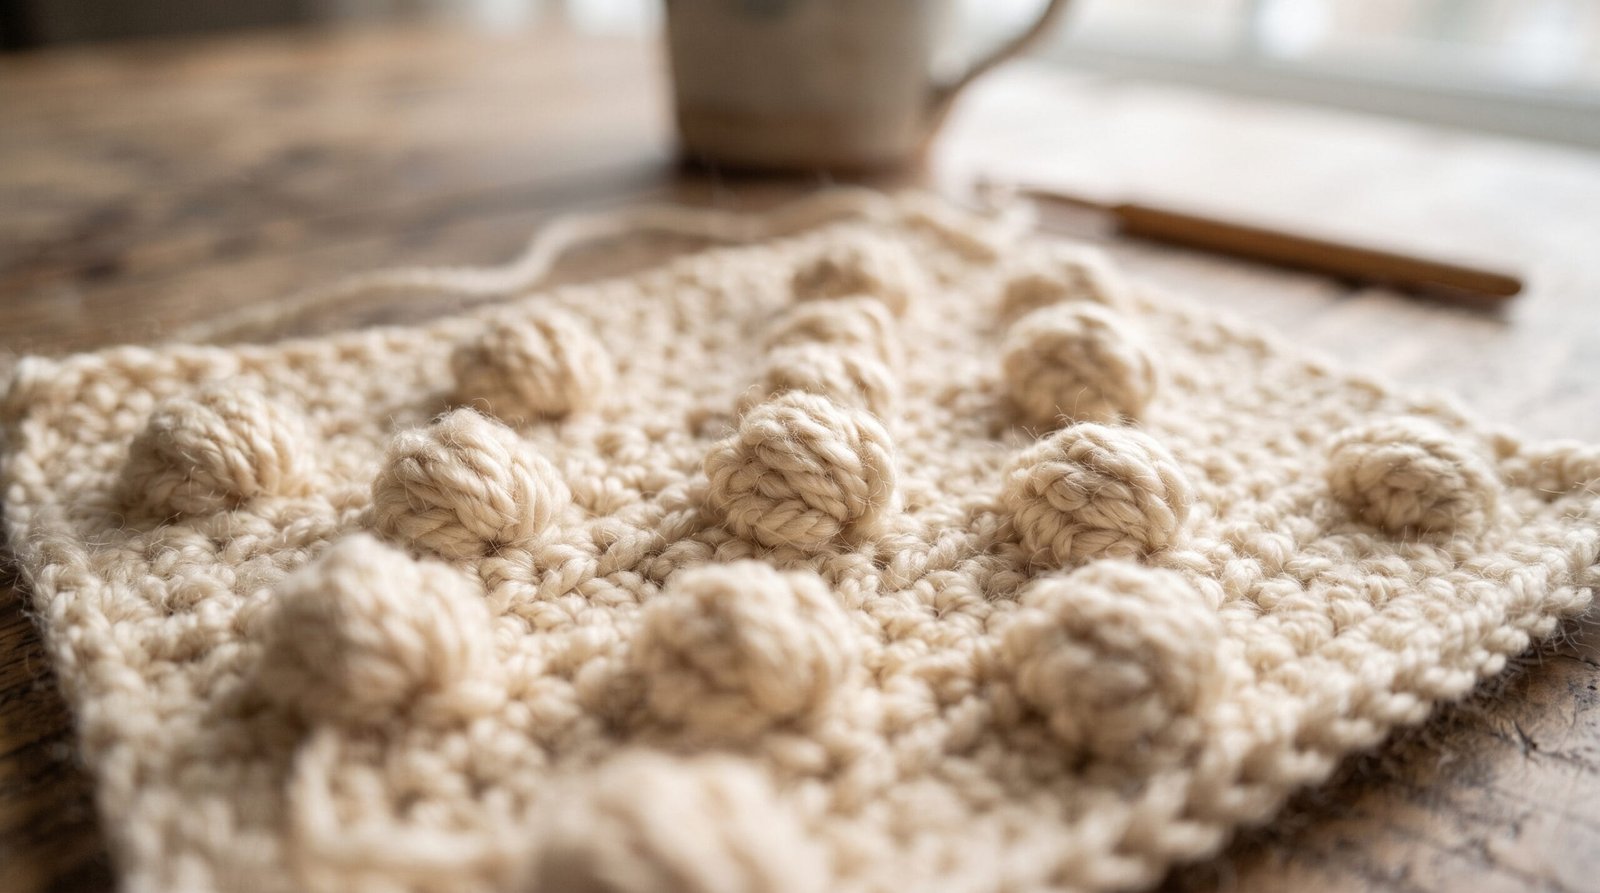
A popcorn stitch is built from a small cluster of complete stitches — usually four or five double crochet — all worked into the same single stitch, then closed at the top so the cluster bunches outward into a rounded, raised bump rather than lying flat. That closing step is what genuinely defines a popcorn stitch as distinct from just working several stitches into one space: without it, you’d have a wide, flat fan shape instead of a dimensional bump.
According to Lion Brand Yarn’s stitch reference{:target=”_blank” rel=”noopener”}, the standard popcorn construction involves working several double crochet stitches into one stitch, then removing the hook from the working loop and reinserting it through the top of the first stitch in that cluster before drawing the dropped loop through — the exact mechanic this guide walks through step by step below.
What You’ll Need
Yarn. A smooth, medium-weight yarn (worsted or DK) shows off popcorn stitch texture more clearly than a fuzzy or heavily textured yarn, since the raised bump relies on visible stitch definition to read clearly against the surrounding flatter fabric.
A standard hook sized to your yarn’s label recommendation — popcorn stitch doesn’t call for any special hook-size adjustment the way amigurumi’s deliberately downsized hook does.
Stitch markers, genuinely useful here even though popcorn stitch itself doesn’t strictly require them — they’re worth using to mark exactly which stitches in a row or round are meant to hold a popcorn, especially in a pattern where popcorns are spaced at intervals rather than worked in every stitch.
How to Crochet a Popcorn Stitch, Step by Step
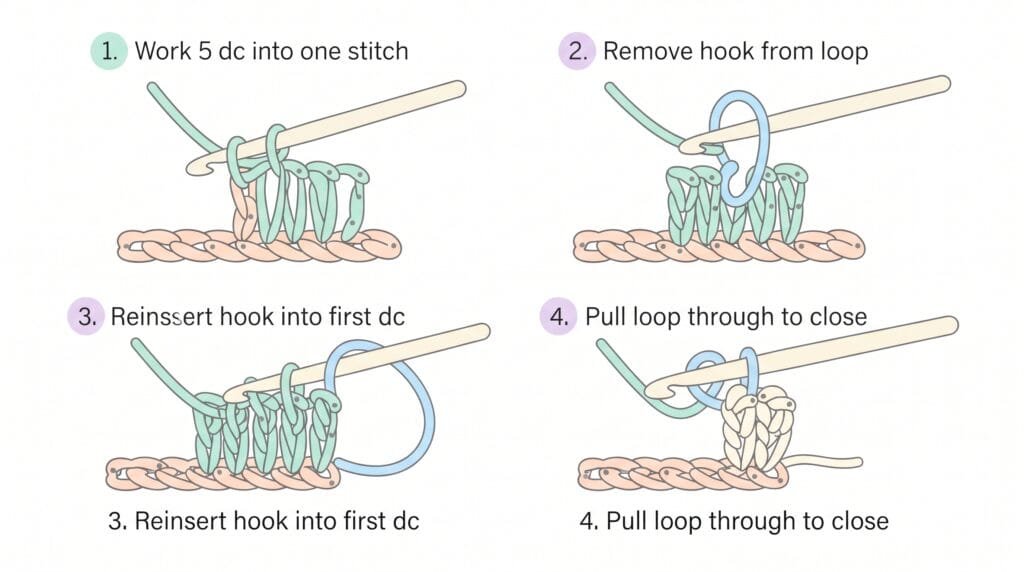
This is the core technique, and it’s worth working through slowly the first several times rather than rushing, since the “remove and reinsert the hook” step is the one part that feels genuinely unfamiliar if you’ve never done it before.
Step one: Work into your target stitch as normal to start — work a complete double crochet into the stitch, then repeat, working three or four more double crochet stitches into that exact same stitch (four total for a smaller, tighter popcorn; five for a fuller, more pronounced one — patterns vary, and either is a legitimate, standard version of the stitch). At this point you’ll have a cluster of double crochet stitches all sharing one base stitch, fanning out slightly since they’re not yet closed at the top.
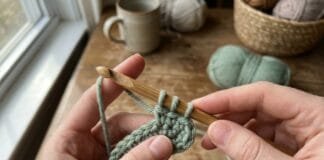
Step two: Remove your hook from the working loop entirely — just slide it out, leaving that loop sitting open and unworked for a moment. This is the step that feels strange the first time, since it’s the opposite of the usual instinct to keep the hook engaged at all times.
Step three: Insert your now-empty hook through the top of the very first double crochet stitch in your cluster — the first one you worked in step one, not the last.
Step four: Reach over and pick up that open loop you set aside in step two, then pull it back through the stitch your hook is now sitting in. This draws the whole cluster together at the top, cinching it into a rounded bump rather than leaving it as a flat fan.
Step five: Chain one to close and secure the popcorn firmly at its base, then continue on to your next stitch as the pattern directs.
The mechanical logic here is genuinely simple once you’ve done it a couple of times: you’re building a small cluster, then physically threading a loop back through the start of that cluster to cinch it closed, the same basic idea as pulling a drawstring tight.
Front vs Back Insertion: The Detail That Changes Everything
This is the single most consequential choice in the entire stitch, and it’s the detail most tutorials mention only in passing.
Inserting your hook from front to back through the first double crochet’s top — reaching in from the side facing you and coming out the back — pushes the finished popcorn to pop out toward you, the side you’re working from. This is the more common default and produces a popcorn that sits proudly on the public-facing side of the fabric.
Inserting from back to front instead — reaching in from behind the fabric and coming out toward you — pushes the popcorn to pop outward on the opposite side, away from you. This matters enormously if you’re working in rows with right-side and wrong-side rows alternating, since a popcorn worked with the “wrong” insertion direction on an even row will end up facing away from the public side of the finished fabric rather than toward it.
Getting this reversed doesn’t ruin the stitch mechanically — the popcorn still forms correctly either way — but it does mean the bump ends up on the wrong side of your work, which is a frustrating thing to discover several rows later rather than catching immediately.
Placing Popcorn Stitches Within a Design
Popcorn stitches are rarely worked in every single stitch across an entire piece — the visual effect works best used deliberately, as an accent within a simpler surrounding fabric.
Spaced at regular intervals — every third, fourth, or fifth stitch, alternating with plain single or double crochet between — is the most common placement, creating a scattered, textured effect across an otherwise plain surface. This is also the easiest placement to plan, since a consistent interval is simple to count and repeat row after row.
Concentrated into a dedicated section — a solid band or border worked entirely in popcorns, rather than scattered — creates a more dramatic, dense texture, often used as a trim or accent stripe rather than across a whole garment or blanket body, since an entire piece worked solidly in popcorn stitch uses considerably more yarn and produces a much heavier, stiffer fabric than the same area in a plain stitch.
Following a plotted design, similar to the ring-chart planning approach covered in our mandala crochet pattern guide, lets popcorns trace out a deliberate shape or pattern — a simple diamond, a cluster resembling a flower center — rather than a uniform scatter. This takes more upfront planning but produces a considerably more intentional-looking finished result than placing popcorns without a plan and hoping the spacing works out.
Working Popcorn Stitch in Rows Versus in the Round
The core mechanics of the stitch itself don’t change between rows and rounds, but a couple of practical considerations shift depending on which you’re working.
In rows, the front-versus-back insertion direction discussed above needs to be considered every single row, since right-side and wrong-side rows alternate which direction actually faces the public side of the fabric. Some patterns solve this by only placing popcorns on right-side rows, working plain stitches on wrong-side rows in between, which sidesteps the whole issue by never needing a popcorn to face backward at all.
In continuous rounds (worked without joining, spiraling upward the way amigurumi typically is), the public side stays consistently facing the same direction throughout, which removes the row-to-row insertion direction question entirely — you decide once which direction pops outward correctly, and every subsequent popcorn follows the same insertion method without needing to flip logic every other round.
Popcorn, Bobble, and Puff Stitch: Genuinely Different Techniques
These three stitches get confused constantly, both because they produce visually similar raised bumps and because pattern writers aren’t always perfectly consistent about which name they use. It’s worth knowing the actual mechanical differences.
Popcorn stitch, covered throughout this guide, is built from several complete, fully-worked double crochet stitches clustered into one base stitch, then closed by removing and reinserting the hook through the first stitch in that cluster. Because each stitch in the cluster is fully completed before the next one starts, a popcorn tends to sit as a distinctly separated, rounder bump.
Bobble stitch is built differently — several incomplete double crochet stitches (each one worked up to its final “yarn over, pull through all remaining loops” step, but not actually finishing that last pull-through) are worked into the same stitch, and then a single final yarn-over pulls through every one of those held-open loops at once, cinching them together in one motion. There’s no removing and reinserting the hook involved at all, which makes bobble stitch mechanically simpler in one sense, though keeping track of several held-open loops on the hook simultaneously has its own learning curve.
Puff stitch follows a similar held-loop logic to bobble stitch, but built from half double crochet stitches (with their shorter single yarn-over) rather than double crochet, worked into the same stitch and drawn through together at the end. This produces a rounder, softer, less angular bump than either popcorn or bobble stitch, since half double crochet’s shorter structure creates a more compact cluster.
Choosing between the three genuinely changes the finished texture, not just the process used to get there — a design specifically calling for “popcorn stitch” will look meaningfully different if worked in bobble or puff stitch instead, so it’s worth using the actual stitch a pattern specifies rather than treating the three as interchangeable.
Yarn and Tension Considerations Specific to Popcorn Stitch
Because popcorn stitch concentrates several stitches into one small area and then cinches them tight, it behaves a little differently than plain stitching in ways worth planning for.
Smoother, more tightly plied yarns show off the stitch’s defined edges more clearly than a loosely spun or fuzzy yarn, where the individual double crochet stitches within the cluster tend to blur together visually rather than reading as a crisp, rounded bump. This doesn’t mean fuzzy yarns can’t be used at all, just that the dimensional effect will read as softer and less sharply defined.
Popcorn stitch uses noticeably more yarn per square inch than a plain stitch covering the same area, since each popcorn packs four or five stitches into the space a single plain stitch would occupy. Estimating yardage for a heavily popcorn-textured project by simply following a plain-stitch gauge swatch will consistently under-estimate how much yarn the actual project needs — worth accounting for with some extra yarn in reserve, similar to the yardage guidance covered for other textured stitches in our fall crochet patterns guide.
Working the base row or round slightly looser than usual, if the popcorns are causing the overall fabric to pull in or cup unexpectedly, can help — the concentrated stitches of a popcorn genuinely take up more width than a plain stitch, and a base row worked at normal tension sometimes isn’t wide enough to accommodate that extra bulk without puckering.
A Simple Approach for Learning How to Make a Popcorn Stitch
If the remove-and-reinsert step feels awkward the first several times — which is completely normal — practicing on a plain swatch, away from the pressure of an actual project, makes the motion click faster than trying to learn it mid-pattern.
A simple practice approach: chain a comfortable length, work one plain row of single crochet as a base, then work a second row placing a popcorn every third or fourth stitch with plain single crochet in between. Repeating this for a few rows, paying attention specifically to which direction the popcorns are popping relative to the side you’re working from, builds the muscle memory faster than trying to also manage a full project’s shaping or color changes at the same time.
Common Mistakes When Crocheting a Popcorn Stitch
The popcorn looks loose or doesn’t hold its rounded shape. This usually traces back to the closing chain-one at the end of step five being worked too loosely, which leaves the cluster’s base without enough tension to hold its cinched shape. Snugging that closing stitch slightly tighter than feels natural helps the popcorn hold a firmer, more defined bump.
Popcorns end up facing the wrong side of the fabric. As covered above, this is almost always the front-versus-back insertion direction being applied inconsistently, particularly across alternating right-side and wrong-side rows. Deciding on one insertion direction and double-checking it explicitly on every popcorn-containing row, rather than assuming muscle memory will get it right, prevents this.
The fabric becomes too stiff or heavy overall. This isn’t really a mistake so much as a design mismatch — a piece worked entirely or almost entirely in popcorn stitch will always be considerably denser and stiffer than the same piece worked in a plain stitch with popcorns used sparingly as an accent. If stiffness wasn’t the goal, reducing how much of the piece uses popcorn stitch, rather than adjusting tension or hook size, is usually the more effective fix.
Losing count of how many stitches are in the cluster. Because four and five-stitch versions are both legitimate and commonly used, it’s easy to lose track partway through, especially working from a pattern that doesn’t specify clearly. Deciding on one count before starting a project and sticking to it consistently throughout avoids a piece with visibly mismatched popcorn sizes.
Where Popcorn Stitch Shows Up in Other Projects
Popcorn stitch earns a real place across several project types already covered on this site, worth knowing about if you’re looking for somewhere to actually apply the technique once it feels comfortable.
The texture-ring discussion in our mandala crochet pattern guide specifically calls out popcorn rounds as an occasional accent ring — the raised, dimensional texture reads well as a deliberate highlight between plainer solid rounds, exactly the “used sparingly” placement principle covered above.
The acorn cap construction discussed in our fall crochet patterns guide also leans on popcorn or bobble texture to suggest an acorn cap’s rougher surface, a good example of popcorn stitch used for a specific representational purpose rather than purely decorative texture.
Full Video of how to make a popcorn stitch in crochet
Common Questions About Popcorn Stitch Crochet
How do I crochet a popcorn stitch if my pattern doesn’t specify four or five double crochet? If a pattern’s stitch key doesn’t state a count, five double crochet is the more commonly assumed default in most published patterns, though four is also entirely standard. When genuinely unclear, working a small test swatch with both counts and comparing which better matches the pattern’s photographed texture is a reasonable way to decide.
What’s the easiest way to make a popcorn stitch without losing the working loop? Keeping the dropped loop small and snug, rather than letting it stretch out loosely when you remove your hook, makes it much easier to pick back up cleanly in step four. Some crocheters place a stitch marker directly into that dropped loop as a temporary hold, which prevents it from working itself larger or twisting while your hook is elsewhere.
Is popcorn stitch crochet difficult for a beginner to learn? The individual stitches involved (double crochet, repeated into one base) aren’t advanced at all — what’s genuinely new is the remove-and-reinsert motion, which most people pick up within a swatch or two of dedicated practice rather than needing extensive prior experience.
Can I substitute popcorn stitch for bobble stitch in a pattern, or vice versa? Visually and texturally, the two produce a noticeably different result — as covered above, popcorn tends to look rounder and more distinctly separated from the surrounding fabric, while bobble looks slightly flatter and more integrated. A direct substitution will change the finished look, even though both use a similar stitch count and produce a generally similar raised effect.
Why does my popcorn stitch look different from row to row even though I’m following the same steps each time? This is almost always the front-versus-back insertion direction being applied inconsistently, discussed earlier, rather than a mistake in the cluster-building steps themselves. Popcorns on alternating right-side and wrong-side rows need the insertion direction flipped to keep facing the same way consistently — working through a swatch specifically checking this, one popcorn at a time, usually reveals exactly where the inconsistency crept in.
Bringing It Together
Popcorn stitch crochet comes down to one core mechanical trick — building a small cluster, then cinching it closed by reinserting your hook through the very first stitch in that cluster — dressed up with a couple of genuinely important details, like insertion direction and how densely to place the finished popcorns within a design. None of it requires an unfamiliar base stitch, just a willingness to practice the remove-and-reinsert motion until it feels automatic.
If you’re working through this stitch on a current project, we’d love to hear how it’s going — share a comment with what you’re making, and follow along for more stitch guides like this one.